contact us

Use the form on the right to contact us.


Naperville, IL 60565
USA

630-639-7372

iPhone-XS-photo.jpg

Blog

Filtering by Author: Paul Whitlock

Print Mailing Labels for Your Holiday Cards with Apple’s Contacts App

Paul Whitlock

Print Mailing Labels for Your Holiday Cards with Apple’s Contacts App

If mailing your holiday cards (which you designed in Photos with a plug-in like Motif or Mimeo Photos, right?) is made harder by having to write addresses on envelopes, you can skip the handwriting step this year. Although many people don’t realize this, it’s easy to print mailing labels on standard label stock using the Contacts app on the Mac. You can even add a personal touch by including a graphic and using a custom color and font choice. Follow these steps:

1.    In Contacts, choose File > New Group to create an empty group into which you can collect your card recipients. Name the group something like Holiday Cards.

2. Click All Contacts to see your full collection of contacts, and then drag your recipients from the center column to copy them into the Holiday Cards group. Note that you have to click and hold briefly before Contacts lets you start dragging a contact. You can drag contacts one at a time or select several at once and drag the entire selection. This doesn’t move contacts out of All Contacts—you’re just adding them to the Holiday Cards group, which functions like a playlist in Music.

3.    Once the Holiday Cards group contains all your recipients, click its name in the sidebar, and then choose File > Print to open the Print dialog.

4. To set up your cards, you need to see details in the Print dialog, so at the bottom of the Print dialog, click the Show Details button (if it’s already called Hide Details, you’re all set). You also need to see the special controls for Contacts, so make sure Contacts is chosen from the pop-up menu underneath the page range fields. Then from the Style pop-up menu, choose Mailing Labels.

5.    Beneath the Style pop-up menu, make sure Layout is selected, and then in the Layout view, from the Page pop-up menus, choose the manufacturer of your labels and the number associated with the labels. (Avery 5160 is a particularly common label type and is readily available at office supply stores and online.)

6. Click Label to switch to the Label view. From the Addresses pop-up menu, choose the type of address you’re using. Home is likely the most appropriate; if you choose All, Contacts will print both Home and Work addresses if available. You can also select the checkboxes for Company and Country here, and if you print the country, you can exclude your own country, which makes it easy to include overseas friends and relatives without printing the country for most people.

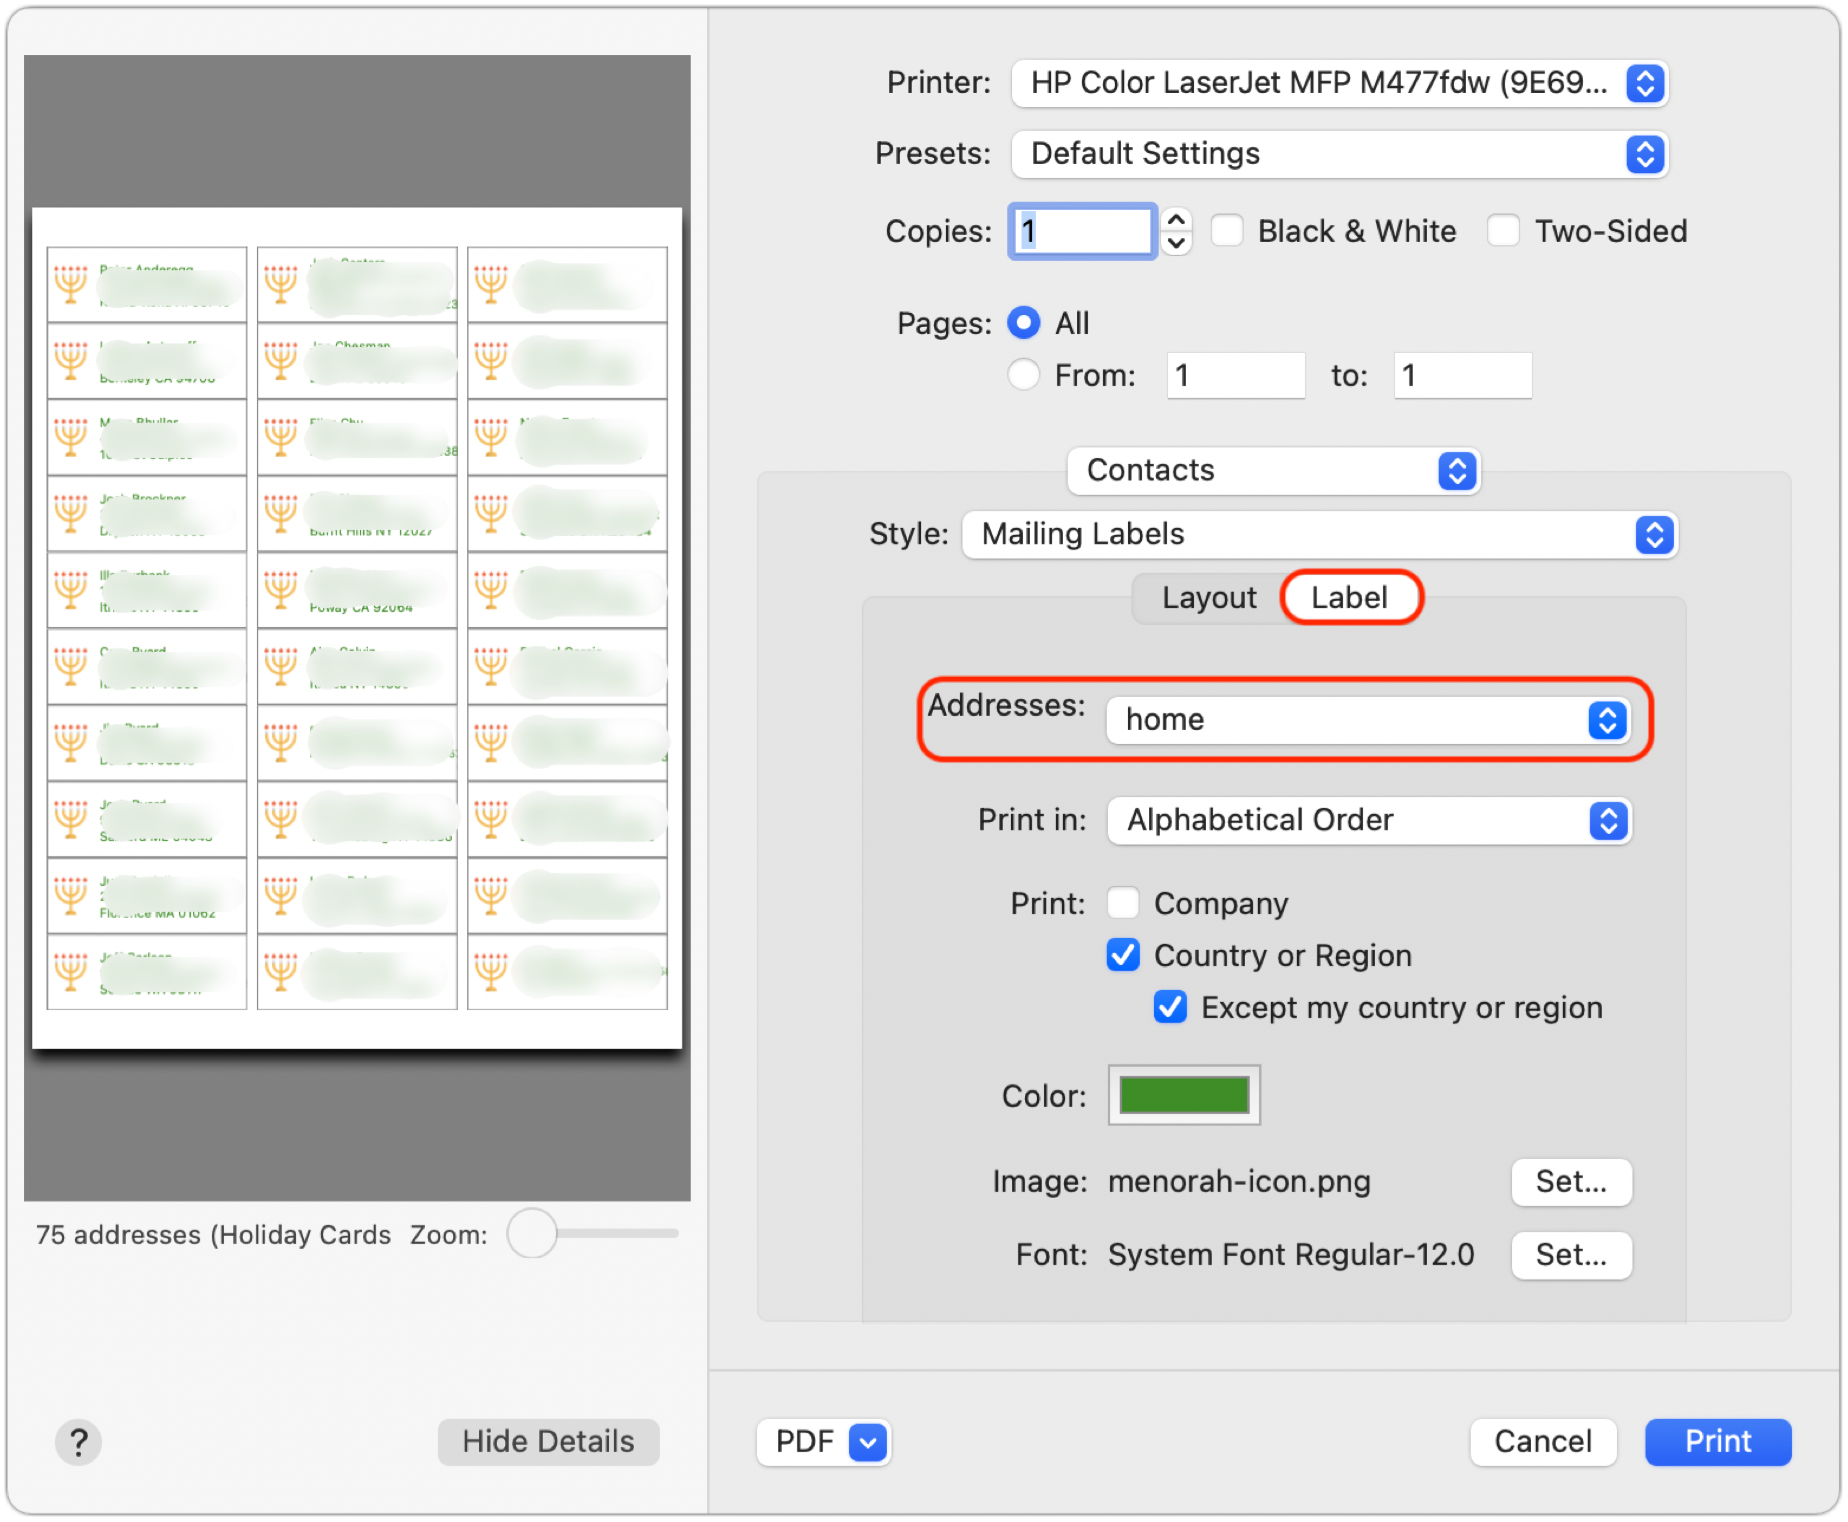
7.    Although the defaults are fine, you can change the color of the label text, select a small image to print next to each contact, and change the font.

8.    It’s time to print, but not on your label stock just yet! Click the Print button to print a draft of your labels on plain paper. You’ll use this draft for two things—checking the addresses for accuracy and verifying that the labels will print properly on the label stock. To check if the labels will print correctly, stack a page from the draft on top of a sheet of blank labels, and then hold them up to a bright light or sunlit window. You should be able to see whether the positioning is right—it should be in most cases. If not, make sure you’ve chosen the right label in the Print dialog, and if all else fails, create a custom label with your own margins and gutters to make it work. You may also want to increase or decrease the font size, making sure that even your longest addresses will fit.

9.3.    Once you’ve fixed addresses for everyone who has moved recently and verified your positioning, you can print for real on your label stock.

There’s only one limitation to using Contacts to print your labels. If you’re a perfectionist, you might want to customize how the names of couples appear on the label. Even though it has the necessary Spouse relationship field that links contacts together, Contacts doesn’t support different name formats on labels. For instance, if you’re sending a card to a couple who share a last name, you might want the name line to read “Barack and Michelle Obama.” The same goes for couples who don’t share a last name, like “Ellen DeGeneres and Portia de Rossi.” The solution for this picky conundrum is Belight Software’s $9.99 Swift Publisher app, which lets you create label templates using individual fields from Contacts.

But that’s overkill for most of us, who care more about what’s inside the envelope. Most of the work comes in selecting people, making sure their addresses are right, and updating those that have changed—actually printing labels takes only a few minutes. As you stick your labels on envelopes, you can revel in the knowledge that it will go even faster next year!

(Featured image by iStock.com/Bet_Noire)

Social Media: Much of the work of sending holiday cards is addressing all those envelopes. However, with the Contacts app on your Mac, you can easily print mailing labels for all your friends and family rather than writing addresses out by hand.

Shrink Apps to Prevent the MacBook Pro Notch from Obscuring App Controls

Paul Whitlock

Shrink Apps to Prevent the MacBook Pro Notch from Obscuring App Controls

The new 14-inch and 16-inch MacBook Pro models feature a camera housing built into the screen, resulting in a notch like that on the iPhone. Most developers are updating their apps to ensure that no controls or menu bar items appear blocked or hidden by the notch, but if you use an older app that doesn’t play nicely with the notch, there’s a fix. Quit the app if it’s running, select it in the Finder’s Applications folder, and choose File > Get Info. In the Info window that opens, select “Scale to fit below built-in camera.” The active area of the display resizes so everything appears below the notch, slightly reducing the overall screen space. This checkbox won’t appear once the app has been updated to avoid the notch. 

(Featured image by Apple)

Apple’s Evolution of Do Not Disturb Helps You Focus

Paul Whitlock

Apple’s Evolution of Do Not Disturb Helps You Focus

Between texts, alarms, reminders, calls, and myriad other notifications on our iPhones, iPads, and Macs, it’s a miracle we get anything done at all. To free us from this onslaught, Apple previously provided Do Not Disturb, which let you set times during which you could be free from interruption.

In iOS 15, iPadOS 15, and macOS 12 Monterey, Apple has gone even further. Do Not Disturb is now called Focus, and Apple has made it more powerful and flexible. Focus can turn on automatically at certain times, at particular locations, or when you’re using certain apps so you can avoid interruptions during activities like working out, doing homework, eating dinner, or gaming. But not all interruptions—you can allow certain people and apps to break through the cone of silence. A Focus can also hide or show certain Home screen pages, prevent notifications from appearing on the Lock screen, and more. Plus, all your devices can share the same Focus settings—we’re showing iPhone screenshots below, but the interface is identical in iPadOS and similar on the Mac, where you’ll find it in System Preferences > Notifications & Focus > Focus.

In Settings > Focus, Apple provides a pre-built Focus for Do Not Disturb, Driving, and Sleep to match the old Do Not Disturb options:

●     Do Not Disturb: This catch-all Focus takes over from the old Do Not Disturb setting.

●     Driving: This Focus replaces the old Do Not Disturb While Driving option. It’s unusual in that it doesn’t allow any app notifications through at all (eyes on the road!). It also lets you write a custom auto-reply for those who text you while you’re driving.

●     Sleep: If you use Apple’s sleep management features in the Health app, you’ll use this Focus to control which notifications can get through while you’re asleep.

Apart from those, Apple makes six suggestions: Personal and Work (in the main list), and Fitness, Gaming, Mindfulness, and Reading (when you add a new Focus). You can also create a custom Focus from scratch.

Apple’s suggestions are special in one important way. Fitness, Gaming, and Mindfulness can turn on automatically: when you’re engaged in a workout, when you connect a wireless controller, and when you’re in a Mindfulness session started from your Apple Watch, respectively.

When configuring a suggested Focus or creating a new one from scratch, Focus runs you through several setup screens. One has you choose people whose notifications you want to come through regardless, and what to do about incoming phone calls. The other screen lets you pick which apps can notify you when the Focus is active, with an additional option to allow notifications marked as Time Sensitive through regardless. (Time Sensitive notifications include timed Reminders alerts, for instance, and are usually best left enabled.)

Once your Focus is ready, you can configure various options, including:

●     Focus Status: Enable this option to allow apps to alert those who message you that you have notifications silenced.

●     Home Screen: If your Focus involves you using the Home screen a lot, you can have it hide notification badges that might lure you into another app or even hide entire Home screen pages that could be distracting.

●     Lock Screen: If you might be looking at your Lock screen while the Focus is active, you can have it dim automatically and hide or show silenced notifications as appropriate.

●     Schedule or Automation: Although you can turn on any Focus from Control Center, it may be easier to have it turn itself on automatically at certain times, in particular locations, or when certain apps are active.

 As with any new feature, it’s going to take a bit to figure out how to make Focus work best for you. We’re still learning it ourselves, but here are some recommendations:

●     To identify when a Focus would be helpful, wait until you find notifications irritating and then think about which ones you’d want a Focus to block.

●     Create just one or two Focuses at first. You don’t want to end up with a bunch that interact in unexpected ways and cause you to miss important notifications. 

●     Be careful with schedules and automations. An automation that invokes the Reading Focus when Books is open might work well for reading before bed but could be problematic if you read while waiting for a meeting to start.

●     It may be safest to allow silenced notifications to appear on the Lock screen so you can easily see what you missed afterward and adjust the Focus as necessary.

You can manually invoke a Focus by tapping the Focus button in Control Center and selecting the one you want. Tap the ••• button to the right of the Focus to specify when it should turn off automatically, or just tap the Focus again to turn it off.

Newness aside, Focus looks like it will help us all cut down on distracting notifications. And if all else fails, stick with just Do Not Disturb, Driving, and Sleep to replicate what we had before.

(Featured image by iStock.com/Daisy-Daisy)

Social Media: Do you want more control over Do Not Disturb on your Apple devices? How about muting notifications while a particular app is active or while you are at a certain location? All this and more is now easy to set up with Apple’s new Focus feature—learn how at: